Author: Arsavi

  • Autofocus Modes Explained

    Most modern digital cameras are equipped with advanced autofocus systems that are often hard to understand. Whether you are shooting with an entry-level or professional camera, knowing how to use the autofocus system effectively is essential to get sharp images. A badly-focused, blurry image can ruin a photograph and you cannot repair it in post-processing.

    If you learn how to focus correctly, you will end up with sharp, perfectly usable images each time, which will make yourself, your family, and your clients happy. Simply put, accurate focus translates to sharper images and that is something everyone is looking for in photographs today.

    I know some photographers will argue with me on this, saying that sometimes image blur yields a “creative” look, but it is one thing when you do it on purpose and another when you consistently mess up just because you don’t know how to focus well with your camera. Once you learn how to properly focus with your camera, you can then decide whether you want to blur something on purpose.

    In this article, I will teach you everything I know about focus modes on modern DSLR and mirrorless cameras. Since autofocus functionality depends on what camera type and model you are using, I obviously cannot go over all the available AF modes, so I will only go through a few camera systems. Since I am a Nikon user, I will put a little more emphasis on Nikon cameras.

    Table of Content

    How camera autofocus works

    The nice thing about digital cameras today is that they come with all kinds of sophisticated autofocus features. If back in the day one had to master both manual focus and autofocus features of their cameras to get images that were in focus, today, one can simply switch to the correct autofocus mode and let the camera do all the hard work.

    Autofocus systems have gotten better and better over the last decade – even the cheapest cameras are now equipped with rather complex algorithms that are capable of automatically scanning the scene and identifying the subject. Some modern cameras can even perform face and eye detection in a scene, utilizing artificial intelligence and machine learning to accurately predict and calculate subject movement.

    To make all this happen, cameras need to utilize specific features and functions that are integrated into different components of the camera. Some of these are based on hardware, while others are based on complex software and algorithms. Let’s go over some of the basics, and see how modern autofocus systems work.

    The importance of contrast

    For autofocus systems to function properly, they need an area of high contrast. If you use your camera to focus on a white wall with no texture, or a blue sky without any clouds, your autofocus system will try to focus a few times and eventually give up. That’s because a blank white wall or a plain blue sky have no contrast or transitions that the camera can use to evaluate focus accuracy:

    However, if you find an area of sudden transition on your wall (say where it goes from one distinct color to another), and you place your focus right in the middle of it (area of the highest contrast), your autofocus system will be able to snap into focus more easily:

    The more contrast, the better – if you can provide more areas of contrast that incorporate both vertical and horizontal lines, your autofocus system will have no problem acquiring focus each time, very accurately:

    The slight slanting of the edges in the above illustration allows any type of focus points (horizontal, vertical, or cross-type, explained further down in the article) to identify areas of high contrast. Try to focus right in the middle of the above chart – your camera should be able to focus without any issues.

    Hence, autofocus systems heavily rely on the presence of areas of high contrast for focusing. Now you know that when a lens starts to “hunt” for focus and fails, it happens because there isn’t enough edge detail (contrast) in the focused area for the autofocus system to work properly. This is why it is always so much easier to focus on subjects with very distinct features!

    Active vs Passive autofocus

    There are two types of AF (Autofocus) systems – Active and Passive. The “Active AF” system works by shooting a red beam on your subject, then bouncing that light back to your camera to figure out the distance between the camera and the subject.

    Once the camera knows what that distance is, it instructs the lens to adjust focus based on this information. The nice thing about Active AF is that it can be used in poorly-lit environments, where normal (passive) AF does not function.

    The bad thing about Active AF is that you can only use it for stationary, non-moving subjects and it only works for close subjects. If you use a Nikon or a Canon speedlight that has an “AF Assist” function, it will use the Active AF system.

    On the other hand, the “Passive AF” system works very differently. Instead of relying on the red beam to find out the distance between the camera and the subject, it either uses “Phase Detection” or “Contrast Detection” (or a combination of both) for detecting contrast.

    Note

    If your camera has an “AF Assist” lamp that occasionally turns on in low-light situations, it is not an “Active AF” beam – all it does is fire direct light at your subject like a flashlight would, so it still relies on your camera’s “Passive AF” system.

    Many compact digital cameras and smartphones often only rely on Contrast Detection AF to acquire focus, while most modern DSLR and mirrorless cameras can use both Phase and Contrast-Detection to acquire focus. Let’s talk about these next.

    Phase Detection AF vs Contrast-Detection AF vs Hybrid AF

    Most modern DSLRs and mirrorless cameras come with several types of autofocus systems that rely on different software and hardware. The first type is Phase Detection AF, which uses an array of microlenses for focusing. As light passes through these microlenses, it splits up into a pair of images.

    The distance between these images is then measured to see how far front or back-focused the subject is. The camera can then use this information to send exact instructions to the lens on which way to turn its focus and by how much.

    As a result, Phase Detection AF is very fast, which makes it ideal for tracking fast-moving subjects. I explain all this in my How Phase Detection Autofocus Works article in much more detail.

    The second type of autofocus system is Contrast Detection AF. Unlike Phase Detection AF that uses hardware, Contrast Detection AF relies on software algorithms that “probe” through areas of an image for edge detail.

    Basically, the part of the scene that needs to be in focus is scanned by the camera – it uses the lens to rapidly change focus from foreground to background until the subject is perfectly sharp / in focus. Because of this focus probing methodology, Contrast Detection AF is generally known to be slow on most cameras.

    At the same time, Contrast Detection AF can be much more reliable and accurate compared to Phase Detection AF when shooting in low-light conditions, which is why some cameras incorporate both. Such cameras can easily switch between Phase and Contrast Detection AF to be able to take advantage of both in different environments – this is known as Hybrid AF.

    Some cameras even have advanced intelligence built into their Hybrid AF implementations, and they are able to combine both Phase Detection and Contrast Detection AF data to get extremely fast and accurate results.

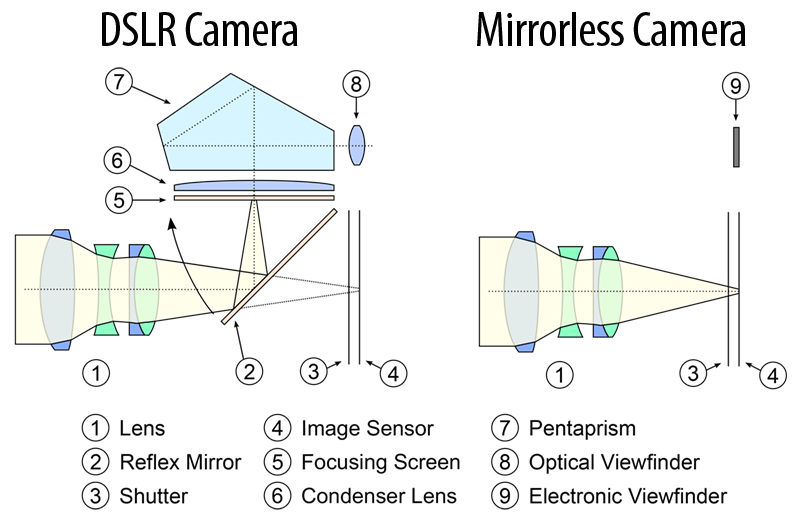
    DSLR vs Mirrorless autofocus systems

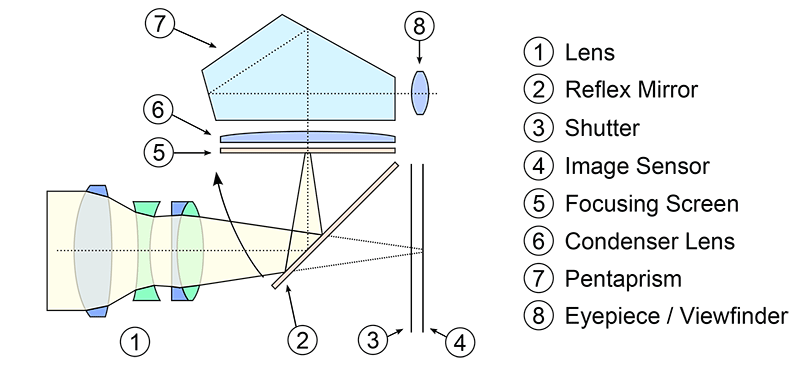
    On DSLR cameras, light passes through the lens into the camera body, then reflects from the reflex mirror into the optical viewfinder (OVF). Part of that light passes through the semi-translucent part of the mirror into a secondary mirror, which then reflects the light into a separate AF sensor located down in the camera chamber. This AF sensor is a separate physical unit that is used exclusively for Phase Detection AF, as illustrated below:

    The AF sensor contains an array of different patterns in different directions that are used for scanning the focused area for contrast. They can be vertical, horizontal, and sometimes even diagonal in their direction. Here is a close-up of the AF module from an advanced Canon DSLR, which shows a complex layout of different sensors:

    Since Contrast Detection AF requires light to actually hit the imaging sensor directly for the autofocus system to probe for contrast, DLSR cameras have to be in “Live View” mode for it to work. This means that while DSLRs can use both Phase and Contrast Detection AF, the former requires the use of the optical viewfinder, while the latter requires the use of the rear camera LCD.

    In contrast, light always reaches the imaging sensor on mirrorless cameras. There is no secondary AF sensor, which means that focusing can only be performed on the imaging sensor itself. Nothing is reflected inside the camera chamber since the picture from the imaging sensor is simply duplicated to an electronic viewfinder (EVF), as shown below:

    Since Phase Detection AF is much faster than Contrast-Detection AF, camera manufacturers figured out ways to integrate separate Phase Detection AF sensors directly on imaging sensors. This way, most mirrorless cameras today are able to perform both types of focusing.

    Don’t worry about all this if it sounds too confusing – the technical information above is just provided to help you understand how autofocus functions. Just remember that the default autofocus behavior on your camera relies on the light that passes through the lens and the type of focus mode you pick, as explained further down below.

    Focus points

    Focus points are the little empty squares or dots that you see when you look through your viewfinder (shown as a red square in the earlier illustrations). Manufacturers often differentiate entry-level cameras from professional ones by implementing different types of autofocus systems.

    Entry-level cameras generally have simple AF systems with a few focus points for basic focusing needs, while pro-level cameras have complex, highly configurable AF systems with lots of focus points.

    These focus points are intentionally laid out in certain parts of the frame and the number of focus points, along with the layout vary not only by the manufacturer but also by camera models.

    Take a look at these two types of autofocus systems with a different number of focus points and different layouts (Left: Nikon D3500, Right: Nikon D810):

    As you can see, the Nikon D3500 has a total of 11 AF points and the Nikon D810 is equipped with a total of 51 AF points – a big difference in total number. Is the number of AF points important? Of course it is – not only do you have more AF points to use while composing your shot and focusing on a particular area of an image, but also the camera AF system can use those different AF points for subject tracking (extremely useful for sports and wildlife photography).

    However, it is not just the sheer number of focus points that make a difference – there are also different types of focus points.

    Types of AF points

    Let’s talk about different types of AF points now. As I have pointed out above, the number of focus points is not the only important factor in autofocus systems – the type of AF points is also very crucial for getting accurate results. Generally, there are three types of AF point sensors available: verticalhorizontal and cross-typeThese only apply to Phase Detection AF, because they rely on hardware sensors.

    Both vertical and horizontal sensors are one-dimensional, and they only detect contrast in one direction. Cross-type sensors are two-dimensional and they can detect contrast both on vertical and horizontal lines, which makes cross-type sensors much more accurate in comparison. What this means, is that the more cross-type sensors your camera has, the better and the more accurate Phase Detection AF is going to be.

    That’s why when new cameras are announced, you will typically see something that says “x number of focus points and x number of cross-type sensors” – manufacturers proudly state the number of focus points and the number of cross-type sensors, especially when those numbers are high.

    For example, this is what Nikon lists under “Key Features” on the Nikon D7100: “Building on the acclaimed autofocus system from the D300s, the D7100 uses 51 focus points, including 15 cross-type sensors for detecting both vertical and horizontal contrast variations, to achieve fast, precise focus”. This means that the total number of focus points is 51, 15 of which are more accurate, cross-type sensors.

    Whenever you shop for a new DSLR camera, pay close attention to the total number of Phase Detection AF points, along with the number of cross-type sensors, because those two are important, especially if you want to shoot sports and fast-moving wildlife.

    On mirrorless cameras, Phase Detection AF pixels on the imaging sensor are designed differently (mostly one-dimensional), so you don’t need to worry about the types of AF points. However, the total number of focus points and their spread in the viewfinder can still matter for things like subject tracking.

    Other factors that impact AF performance

    As you can see, both the total number of focus points and their types can be very important. However, those are not the only two things that are needed to get accurate results. The quality of light is another important factor that can seriously affect autofocus performance.

    By now, you probably already know that your camera autofocus works great when you shoot in daylight conditions, and it starts to suffer when you move indoors to challenging light.

    Why is this the case? Because in low-light conditions, it is much tougher for your camera to detect contrast. Remember, Passive Autofocus completely relies on the light that passes through the lens. If the quality of that light is poor, so is its autofocus performance.

    Note: If you want to make some adjustments to the photo just let me know. I can do it for you at a very low cost. You can hire me to edit your photo.

    There are a few other factors that can affect autofocus performance, such as your camera’s focus detection range, lens maximum aperture and the speed of focus motors. The focus detection range is an important factor because it affects how sensitive your camera’s autofocus system is to low light.

    This can be especially important when using teleconverters with lenses, which can reduce the maximum aperture by up to 2 stops (with a 2x teleconverter) – a big difference.

    When using slower lenses, older cameras might fail to autofocus in less than ideal conditions. In comparison, newer cameras often feature a wider focus detection range, which allows them to focus reliably even in extremely dark conditions.

    In terms of lens maximum aperture, there is a reason why pro-level f/2.8 lenses focus much faster than f/5.6 consumer zoom lenses: f/2.8 is a sweet spot for autofocus systems, as the lens aperture is neither too wide, nor too narrow.

    Fast f/1.4 prime lenses are usually slower than f/2.8 lenses because they require more rotations of lens elements to achieve precise focus. Precision is key at such wide apertures, as depth of field is extremely shallow.

    Ideally, the lens aperture should be between f/2.0 and f/2.8 for the best autofocus performance. Smaller maximum apertures like f/5.6 mean less light passing through the lens, making autofocus operation more difficult. Therefore, lenses with large maximum aperture are generally better for the autofocus system.

    The speed of the focus motors is another important factor. Older lenses generally have slow screw-drive AF motors, while newer lenses feature much faster silent-wave or linear motors. Some high-end lenses even feature multiple linear motors, which is often needed when moving large and heavy lens groups.

    Lastly, the overall quality and reliability of the AF system in a camera should not be ignored. Keep in mind that both DSLR and mirrorless camera manufacturers continuously work on tweaking their AF systems and algorithms.

    As a result, it is becoming more common to release fixes and improvements to autofocus systems via firmware updates. Always make sure that you are running the latest and greatest firmware version, so that you can take advantage of all the latest tweaks to the autofocus system.

    AF point coverage

    Another important factor is the AF point coverage. This has to do with how far focus points can reach to the edges of the frame before they can no longer be utilized for focus selection and tracking.

    While it might not directly affect autofocus performance, AF point coverage can be an extremely important factor when tracking fast-moving subjects. This is where mirrorless cameras offer big advantages over their DSLR counterparts, because Phase-Detection AF sensors can be integrated into areas that are impossible to reach for a DSLR. Take a look at the below image that shows the AF point coverage on the Sony A7 III:

    As you can see, it stretches practically to the edges of the frame, which allows the camera to continue tracking subjects no matter where they end up, as long as they are still somewhere in the frame.

    DSLR cameras are limited by the size of the secondary mirror and the AF sensor, optical distortion, vignetting, and other issues, which results in only the center part of the frame being adequately covered.

    Autofocus modes

    Nowadays, most digital cameras are equipped with several different focus modes for various situations. It is one thing to photograph a still subject’s portrait, and another to photograph a running person or a bird in flight.

    When photographing still subjects, you generally acquire focus once and take a picture. If the subject moves, you re-acquire focus again and take another picture.

    But if you have a subject that is continuously moving, you need your camera to readjust focus automatically as you take pictures. The good news is that your camera has built-in functionality to handle such situations.

    Let’s go over these focus modes in more detail.

    Single AF (AF-S) mode

    The “Single AF” mode (AF-S), also known as “Single Area AF” on Nikon and “One-Shot AF” on Canon cameras, is a pretty straightforward way to acquire focus. You pick one focus point and your camera will look for contrast just in that single focus point.

    When you half-press the shutter or press a dedicated focusing button (if you have one), the camera will snap into focus once, and if your subject moves, it won’t reacquire focus even if you continue half-pressing the button. Hence, the focus remains “locked”.

    The AF-S mode often requires the camera to lock into focus before allowing you to take a picture, so if the focus is not acquired properly, pressing the shutter will do nothing due to focus error.

    Some cameras allow you to change this behavior though. On Nikon DSLR and mirrorless cameras, for example, you can set “AF-S Priority Selection” under the “Autofocus” custom settings menu to “Release”, which lets you take pictures even when your subject is not in focus.

    A couple of things to note about the AF-S mode – if you mount an external speedlight that has an “AF-Assist” red beam, you will need to be in AF-S mode for it to work. The same is true for the “AF-Assist” lamp in front of your camera, it will only function in AF-S mode.

    Continuous AF (AF-C) mode

    Another focus mode that is available on all modern DSLR and mirrorless cameras is called “Continuous AF” (AF-C), which is also known as “AI Servo” in the Canon world. This mode is used for tracking moving subjects, such as when photographing sports, wildlife, and fast-moving action.

    The AF-C mode is much more complex when compared to AF-S because the autofocus speed and tracking algorithms can heavily depend on the type of subject, how fast and how unpredictable it moves.

    Some AF-C implementations use all kinds of calculations that take advantage of artificial intelligence and machine learning for analyzing and predicting subject movement. This is one area camera manufacturers always put a lot of emphasis on, so you will see the most number of related focus options in the camera menu.

    The nice thing about the AF-C mode is that it will automatically re-adjust focus if you or your subject move. All you need to do is continue half-pressing the shutter button or holding the dedicated AF button (if you have one) on your camera, and the autofocus system will automatically track movement and adjust focus.

    Most modern autofocus systems allow using more than one focus point for dynamic subject tracking in AF-C mode, which I cover further down below in this article.

    Note: If you want to make some adjustments to the photo just let me know. I can do it for you at a very low cost. You can hire me to edit your photo.

    AF auto (AF-A) / hybrid mode

    Some cameras also have a mode called “AF Auto” (AF-A) or something like “AI Focus AF” (Canon), which is basically a hybrid mode that automatically switches between AF-S and AF-C modes. If the camera thinks that the subject is stationary, it switches to AF-S, and if the subject moves, it will automatically switch to AF-C mode.

    By default, most entry-level cameras are set to AF-A, which works quite well in most situations. Many of the higher-end / professional cameras do not have this mode, since it is designed for beginners in mind.

    Full-time servo (AF-F) focus mode

    The Full-time Servo AF mode, also known as “AF-F”, was introduced by Nikon specifically for recording videos on its DSLR and mirrorless cameras. This mode automatically tracks subject movement and acquires focus during video recording. Don’t worry about this mode if you do not shoot video.

    Personally, I typically leave all of my Nikon cameras in AF-C mode and only switch to AF-S when the camera cannot focus in low-light situations.

    Changing focus modes

    If you do not know how to change the focus mode on your camera, I recommend checking out your camera manual, because different cameras handle this differently.

    For example, all entry-level Nikon DSLRs require going into the camera “Info” screen to change the focus mode, while higher-end DSLR and mirrorless cameras have a dedicated switch or a button to toggle between different focus modes. For example, here is how you change the focus mode on the Nikon D850:

    First, you press and hold the AF-mode button on the front of the camera, then you rotate the rear dial (Main command dial) to switch between AF-S, AF-C and M (manual focus) modes.

    AF-area modes

    To make things more confusing, many digital cameras also have something called “AF-Area Mode”, which allows photographers to choose several options to use while operating in AF-S, AF-C, AF-A, and AF-F modes.

    Many of the entry-level / semi-professional cameras allow you to pick a certain “AF-Area Mode” within the camera menu, while pro-level cameras typically have a dedicated button for it. So, what do these AF-Area Modes do? Let’s go through them one by one.

    Pinpoint AF mode

    The pinpoint AF mode is a Nikon-specific mode that is designed to utilize Contrast Detection AF in order to precisely focus on a very small portion of the scene. The autofocus point becomes a small spot, which you can slowly move to any part of the screen, including the extreme edges.

    Use this mode when you need to acquire precise focus when photographing stationary subjects (landscapes, architecture, product, macro, etc). It is only available in AF-S mode.

    Single-point AF-area mode

    When you choose the “Single Point” (Nikon) or “Manual AF Point” (Canon) AF-Area Mode, the camera only uses one focus point that you choose in your viewfinder to acquire focus.

    So if you move your focus point up/down/left/right, the camera will detect contrast only on that particular focus point. I use Single Point AF-Area Mode when photographing landscapes, architecture, and other stationary subjects.

    Dynamic AF-area mode

    In “Dynamic” (Nikon) or “AF Point Expansion” (Canon) AF-Area Mode, you still choose one focal point and the camera will initially acquire focus on that particular focus point. However, once the focus is acquired, if your subject moves, the camera will utilize the surrounding focus points to track subject movement and keep the focus on your subject.

    You are expected to track the subject by panning the camera along with the subject and making sure that the subject stays close to the initially selected focus point. If the camera selects a surrounding/different AF point, it might not be directly visible inside the viewfinder at the time of capture.

    The Dynamic AF-Area Mode works great for fast-moving subjects like birds because it is not easy to keep the focus on birds in flight. Higher-end DSLR and mirrorless cameras have the ability to control the number of surrounding focus points to activate for this type of shooting.

    For example, the Nikon D810 allows choosing between 9, 11, 21, and 51 points in Dynamic AF-Area Mode. So if you only wanted to track a small portion of the scene, you would pick 9 points and if you wanted to track the entire frame, you could pick all 51 points to track your subject.

    Lastly, many of the modern DSLRs from Nikon have a “3D-Tracking Mode”, where you initially pick the AF point and the camera will automatically activate as many focus points as needed to track subject movement. The cool thing about the 3D-Tracking mode is that it uses a special scene-recognition system that actually reads colors and will track your subject automatically, letting you compose your shot while the subject moves.

    For example, if you are photographing a white bird among many black birds, the 3D-Tracking system will automatically focus on and track the white bird, even if the bird moves or if you move the camera, letting you compose your shot.

    If you compare 3D-Tracking to Dynamic AF-Area with a certain number of focus points selected, the 3D-Tracking method will use all available focus points on the camera to track your subject, while the Dynamic AF-Area mode divides the focus points to “zones”, activating only the surrounding focus points (as many as you selected).

    For example, if you choose 9 focus points, subject tracking will only work within a zone of 9 total focus points that are surrounding the focus point you picked. If your subject moves away from all 9 focus points, the camera will not be able to focus on the subject anymore.

    In 3D-Tracking mode, the camera will continue tracking the subject (newly selected focus points will be displayed in the viewfinder), even if it significantly moves away from your initial focus point.

    I use the Dynamic AF-Area mode a lot when photographing wildlife and typically shoot with a smaller number of focus points activated (between 9 and 21 focus points).

    But if the action is very chaotic and I have a bunch of random birds flying towards me, choosing the 3D-Tracking mode does a fairly good job at finding a subject to focus on and track it continuously.

    Note: If you want to make some adjustments to the photo just let me know. I can do it for you at a very low cost. You can hire me to edit your photo.

    Auto-area AF mode

    The “Auto-Area AF” (Nikon) or “Automatic AF Point Selection” (Canon) Mode is the “point-and-shoot” method of acquiring focus. Depending on what you are photographing, it will automatically pick what to focus on. It is a pretty complex mode because it will actually recognize the skin tones of a person in the frame and will automatically focus on them.

    If there are multiple people in the frame, it will focus on those that are closest to the camera. If the camera does not detect any skin tones, it will typically focus on the closest and largest object in the frame.

    If you shoot in AF-S mode and select “Auto-Area AF”, the camera will actually display what focus points it will use for a second, allowing you to see and confirm the area the camera will focus on.

    The same thing can be done on Canon DSLRs, but it is called “Automatic AF point selection in One-Shot AF mode”. I never use this mode, because I want to control where to focus, instead of letting the camera do it for me.

    Group-area AF mode

    Another Nikon-specific mode is called “Group-Area Autofocus”. When compared to the regular Single-Point AF mode, Group-Area AF activates five focus points to track subjects.

    This focus mode is great for initial focus acquisition and tracking of subjects when compared to a Single-Point or Dynamic AF, especially when dealing with smaller birds that fly erratically and can be really hard to focus on and track.

    In such situations, the Group-Area AF mode might give better results than Dynamic AF, showing better shot-to-shot accuracy and consistency.

    How does Group-Area AF work? Basically, within the viewfinder, you see four focus points, with the fifth one in the middle hidden. You can move all four focus points by pressing the multi-touch controller on the back of the camera (ideally, you want to stay in the middle, because the focus points in the center of the frame are cross-type and the most accurate).

    When pointed at a subject, all five focus points are activated simultaneously for the initial focus acquisition, with priority given to the closest subject. This differs from the Dynamic 9 (D9) AF mode quite a bit, because D9 activates 8 focus points around the center focus point, with priority given to the chosen center focus point.

    If the camera fails to focus using the center focus point (not enough contrast), it attempts to do it with the other 8 focus points. Basically, the camera will always prioritize the central focus point and only fail-over to the other 8 if autofocus is not possible.

    In contrast, Group-Area AF uses all 5 focus points simultaneously and will attempt to focus on the nearest subject, without giving preference to any of the 5 focus points.

    Group-Area AF is especially useful when photographing birds, wildlife, and non-team sports. In the above sample image of speed skaters, if your goal is to focus on the front runner, Group-Area AF would do wonders, as it would automatically acquire focus on and track the runner that is closest to the camera.

    Another good example can be a perched bird sitting on a stick and you are looking at it a little from above, so the ground behind the bird is clearly visible. With Dynamic AF mode, whatever you are pointing at is where the camera will initially attempt to acquire focus.

    If you are right on the bird, the camera will focus on the bird. If you accidentally point to the ground behind the bird, the camera will focus on the background instead. This can get quite challenging when photographing small birds, especially when the branch or stick they are sitting on is constantly moving.

    Getting the initial focus point is important, and the quicker you do it, the better the chance of capturing and tracking action, especially if the bird decides to suddenly take off.

    As I have mentioned above, with Group-Area AF, there is no preference given to any focus point, so all 5 focus points are active simultaneously. In this particular situation, since the bird is closer than the background, as long as one of the 5 focus points is near the bird, the camera will always focus on the bird and not the background.

    Once focus is acquired, Group-Area AF will also track the subject, but again, only if one of the 5 focus points is near the subject. If the subject moves fast and you cannot effectively pan your camera in the same direction, focus will be lost, similarly to what happens in Dynamic 9 AF mode.

    In terms of tracking, I personally find Group-Area AF to be pretty fast, but it is hard to say if it is as fast as Dynamic 9 AF – in some situations, Dynamic 9 AF seems to be a bit faster.

    Another important fact I should mention, is that when you use Group-Area AF in AF-S mode, the camera will engage face recognition and attempt to focus on the eye of the nearest person, which is neat.

    For example, if you are photographing someone between tree branches and leaves, the camera will always attempt to focus on the person’s face instead of the nearest leaf. Unfortunately, face recognition is activated only in AF-S mode on Nikon DSLRs, so if you photograph fast-moving group sports and you need the camera to lock and track on a subject’s face (and not on the nearest object), your best bet will be to use Dynamic AF instead.

    Here is an illustrated comparison of each Nikon AF mode (image courtesy of Nikon USA):

    Clockwise from the top left: Single-Point AF mode, Dynamic-Area AF mode (9 points), Dynamic-Area AF mode (21 points), Dynamic-Area AF mode (51 points), 3D-Tracking mode, Auto-Area AF mode, and Group-Area AF mode.

    Other area modes

    Some of the newer Nikon cameras have additional AF-Area Modes like “Face-Priority AF”, “Wide-Area AF”, “Normal-Area AF” and “Subject-Tracking AF” for use in video recording. I’m not going to discuss each one of these in detail, because they are specific to certain camera models and will probably change in the future. Canon also has some AF-Area Modes like “Spot AF”, where you could fine-tune your focus inside a focus point.

    When to use different AF-area modes

    Why do you need to know how and when to use different AF-Area Modes? Because each one of them can be combined with Focus Modes! To make things easier to understand, I compiled a chart with examples for you (for Nikon cameras):

    AF-Area ModeNikon Focus Modes
    AF-S ModeAF-C ModeAF-A Mode

    Pinpoint AF-Area Mode (Live View Only)
    Camera acquires focus only once and on the selected single focus point only.Disabled, only works in AF-S.Disabled, only works in AF-S.

    Single-Point AF-Area Mode
    Camera acquires focus only once and on the selected single focus point only.Camera focuses on the selected single focus point only and will reacquire focus if the subject moves.Camera detects if subject is stationary or moving and will automatically select whether to use AF-S or AF-C. Only one focus point is used in either case.

    Dynamic AF-Area Mode
    Disabled, works just like Single-Point AF.You choose an initial focus point and once the camera acquires focus on the subject, it will engage the surrounding focus points to track subject movement. The number of surrounding focus points to use can be selected in camera menu.Camera detects if subject is stationary or moving and will automatically select whether to use AF-S or AF-C.

    Dynamic AF-Area with 3D-Tracking
    Disabled, works just like Single-Point AF.Instead of using a particular number of surrounding focus points, the 3D-Tracking activates all available focus points and uses color recognition to track subjects. You pick the initial focus point and the camera will track the subject across the frame automatically, letting you recompose the shot without losing focus on the subject.Camera detects if subject is stationary or moving and will automatically select whether to use AF-S or AF-C.

    Group-Area AF Mode
    Camera activates five focus points and focuses on the nearest subject. If faces are detected, the camera will give priority to portrait subjects.Camera automatically focuses on the nearest subject and will track the subject in the frame, as long as the subject remains close to the five selected points. Face detection is disabled.Not available.

    Auto-Area AF Mode
    Camera automatically picks a focus point, depending on what’s in the frame.Camera automatically picks a focus point on a moving subject and will track the subject in the frame.Camera detects if subject is stationary or moving and will automatically select whether o use AF-S or AF-C.

    Changing AF-Area Modes

    To find out how to change the AF-Area Mode on your camera, once again, I recommend checking out your camera manual. If you have an entry-level camera, you will most likely have to go through the camera menu to change your AF-Area mode.

    If you have a higher-end DSLR or mirrorless camera, you might be able to quickly toggle through different AF-Area modes by pressing a combination of different buttons.

    For example, on the Nikon D850 DSLR, you have to press the same AF-mode button on the front of the camera, then rotate the front dial (Sub-command dial) to change the AF-Area mode, as shown below:

    Note: If you want to make some adjustments to the photo just let me know. I can do it for you at a very low cost. You can hire me to edit your photo.

    Autofocus scenarios and examples

    So far you have read a lot of technical information on each focus mode and AF-Area modes. Let’s now go through different scenarios and examples for you to fully understand and grasp the information above. The camera settings I show below only apply to Nikon DSLR cameras, but the concepts remain the same for any other camera system out there.

    Scenario #1 – Photographing Outdoor Sports

    Which autofocus mode and AF-Area mode would you choose when photographing outdoor sports like football? Let’s start with choosing the right Autofocus Mode. Obviously, using the Single AF / AF-S mode is not going to work, since you need the camera to re-adjust focus continuously as you half-press the shutter / AF buttons on your camera.

    Therefore, we must use either AF-C or AF-A modes. In such situations, we know that the subjects move continuously all the time, so I would just pick the AF-C mode. What about AF-Area mode? Should you use the Single-Point AF-Area Mode, Dynamic AF-Area Mode, Group-Area AF Mode or the 3D-Tracking Mode? I would personally choose the 3D-Tracking mode and let my camera deal with tracking the subjects while I compose my shots.

    If you find that 3D-Tracking is not working out well and it fails to track your subjects correctly (or you have one particular subject to track), then switch to Dynamic AF-Area mode with a relatively high number of focus points, especially if you are close to the action.

    Group-Area AF would work great if you only want to track the subject that is closest to the camera. Here is a summary of the settings I would use:

    1. Autofocus Mode: AF-C
    2. AF-Area Mode: 3D-Tracking, Dynamic AF-Area or Group-Area AF
    3. Custom Settings->Dynamic AF Area: 21-points or 51-points
    4. Custom Settings->AF-C Priority Selection: Release+Focus

    Scenario #2 – Photographing People Outdoors

    When taking portraits of people that pose for you outdoors in daylight, any of the autofocus modes should work perfectly fine. If you shoot in AF-S mode, the camera will only focus once when you half-press the shutter, so just make sure that you or your subjects don’t move once you acquire focus right before taking a picture.

    By default, your camera should not let you fire, if the focus is not properly acquired in AF-S mode. If you are shooting in AF-C mode, just make sure to acquire good focus before taking a picture. AF-A mode works great for portraits as well. When it comes to AF-Area modes, I would stick with the Single-Point AF-Area Mode, since your subjects are stationary.

    1. Autofocus Mode: AF-S, AF-C or AF-A
    2. AF-Area Mode: Single-Point AF-Area
    3. Custom Settings->AF-S Priority Selection: Focus
    4. Custom Settings->AF-C Priority Selection: Release+Focus

    It goes without saying that you should always focus on the closest eye of your subject, especially when standing close.

    Now, if you use a modern DSLR or a mirrorless camera that has Face or Eye-Detection Autofocus modes available, make sure to use them! On a Nikon Z mirrorless camera, the settings would be the following:

    1. Autofocus Mode: AF-C
    2. AF-Area Mode: Auto-Area AF
    3. Custom Settings->Auto-Area AF Face/Eye Detection: Face and Eye Detection On
    4. Custom Settings->AF-C Priority Selection: Release

    Scenario #3 – Photographing People Indoors

    Photographing people indoors can be quite challenging, especially in low-light. If the light levels indoors are poor, I would shoot in AF-S mode to make sure that my AF-Assist beam helps me when needed.

    If you are using a speedlight, AF-S will make your speedlight use the AF-Assist red beam to acquire focus. You cannot do that in AF-C mode. The AF-A mode should also work well for these types of situations, but I would still opt to use the AF-S mode instead.

    In terms of AF-Area modes, I would pick the Single-point AF-Area Mode and choose the center autofocus point for better accuracy when shooting in low-light situations.

    1. Autofocus Mode: AF-S
    2. AF-Area Mode: Single-Point AF-Area
    3. Custom Settings->AF-S Priority Selection: Focus
    4. Custom Settings->Low-light AF: On

    Scenario #4 – Photographing Birds in Flight

    Birds are extremely tough to photograph since it is hard to predict their behavior and they are often very fast. As I have pointed out above, I would shoot in Continuous AF / AF-C mode and pick either Group-Area AF Mode or Dynamic AF-Area Mode with focus points between 9 and 21 (I prefer to leave focus points at 21, but 9 is generally faster).

    I have tried using 51 focus points and also tried shooting in 3D-Tracking mode, but found those to be slower and less reliable than using fewer focus points. I use the center focus point 99% of the time when photographing birds and only change focus points when birds are perched on something.

    Again, the center focus point is normally going to give you the best results. If you are dealing with small birds and have a hard time with initial focus acquisition, give Group-Area AF a try (if available).

    1. Autofocus Mode: AF-C
    2. AF-Area Mode: Dynamic AF-Area or Group-Area AF
    3. Custom Settings->Dynamic AF Area: 9-points or 21-points
    4. Custom Settings->AF-C Priority Selection: Release+Focus

    Scenario #5 – Photographing Landscapes and Architecture

    For landscapes and architecture, all focus modes work fine, but I prefer to switch to AF-S or pinpoint modes since there is nothing to track. In low-light situations, you will not be able to utilize the AF-Assist function on your camera anyway (because of distance issues).

    Use Live View when possible for accurate focusing (zoom in to 100% first) and use Contrast Detect AF to focus on a bright object in your scene. Otherwise, the only other option is to turn off autofocus and manually focus your lens. When taking pictures of landscapes and architecture, you have to be extremely careful about where to focus and need to understand such things as hyperfocal distance well.

    You can find more information about these in my detailed Landscape Photography Guide. In terms of AF-Area mode, you want to use either Pinpoint AF or Single-Point AF-Area Mode in order to focus precisely on a certain part of the frame.

    1. Autofocus Mode: AF-S
    2. AF-Area Mode: Pinpoint AF or Single-point AF-Area
    3. Custom Settings->AF-S Priority Selection: Focus

    Scenario #6 – Photographing Large Animals / Wildlife

    When photographing large animals, I would shoot in Continuous AF / AF-C mode and use Dynamic AF-Area or 3D-Tracking modes, both of which work great.

    Animals are normally not as fast as birds (although they can be even faster at times), so unless you are shooting fast action, I would just pick Dynamic AF-Area with the highest number of focus points or use 3D-Tracking.

    1. Autofocus Mode: AF-C
    2. AF-Area Mode: Dynamic AF-Area / 3D-Tracking
    3. Custom Settings->Dynamic AF Area: Highest number of AF points or 3D
    4. Custom Settings->AF-C Priority Selection: Release+Focus

    Scenario #7 – Photographing Small Groups

    I frequently get asked about how to focus when photographing a small group of people. Before I talk about focus modes, let me point out a few important things here.

    If you are using a telephoto lens, you have to be careful about the camera-to-subject distance when using large apertures. If you stand too close to the group and use large apertures like f/1.4-f/2.8, only one or two people might be in focus while everyone else is blurred, unless everyone is positioned on the same focus plane.

    The solution is to either change your aperture to something smaller like f/5.6 or f/8 or to stand back / move away from the group, so that your depth of field is increased, or do both. If you want to blur the background and shoot at large apertures, your only choice is to put everyone on the same focus plane, parallel to your camera.

    Imagine how the group would be standing if they were all touching a flat wall with their heads – that’s how they need to stand. In terms of autofocus modes, if you are shooting in broad daylight, any of the AF modes work fine and I would pick Single-Point AF-Area Mode for focusing.

    1. Autofocus Mode: AF-S, AF-C or AF-A
    2. AF-Area Mode: Single-Point AF-Area
    3. Custom Settings->AF-S Priority Selection: Focus
    4. Custom Settings->AF-C Priority Selection: Release+Focus

    Note: As you may have noticed, I always leave my “AF-S Priority Selection” and “AF-C Priority Selection” to be “Focus” and “Release+Focus”, respectively. Here is why. By keeping “AF-S Priority Selection” at “Focus”, I force my camera to not let me take a picture when I do not have good focus.

    I do not use the AF-S mode very often, but when I do, I want to make sure that my focus stays good. As for the “AF-C Priority Selection”, the “Release+Focus” mode works great for most situations – the camera will do its best to acquire good focus, but won’t hold up or delay the shutter too much, letting me shoot when I want.

    I don’t see the point of using either “Release” or “Focus” in AF-C mode. “Release” won’t care if your focus is good or not (what’s the point of autofocus then?) and “Focus” won’t let you take a picture until focus is locked.

    If I want my focus to be that accurate, I will switch to AF-S mode instead. Just leave these two settings as shown above and forget about them.

    Hopefully, the above scenarios will be useful for you to understand when to use different autofocus and AF-Area modes. Now might be a good time to go back and review the chart above and see how well you can understand it.

    Note: If you want to make some adjustments to the photo just let me know. I can do it for you at a very low cost. You can hire me to edit your photos.

    Tips to improve autofocus performance in low light

    As I have pointed out earlier, focusing in bright, sunny environments is often quite easy and our cameras handle that pretty well. But people start having all kinds of problems when shooting in low-light conditions, especially indoors. Here are some tips for you if you have challenges shooting in low light:

    Use the center focus point.

    Whether your camera is equipped with 9 or 51 focus points, you do not want to use the focus points in the corners of the frame when shooting in low-light conditions, simply because they are not going to be as sensitive and accurate. The center focus point is often your best bet because it is a cross-type sensor that works better than any other focal point in your camera.

    But what about framing and composition if you have to focus on the center? For those situations, the solution is to move the autofocus function from your shutter release to a dedicated button on the back of the camera, then focus on your subject and recompose. This technique is called “focus and recompose” using back-button focusing.

    Most digital cameras, including entry-level ones, can do this. Professional-level cameras have a dedicated button for focusing called “AF-ON”, which is specifically designed for back-button focusing and you can easily activate it through the camera menu (“Custom Settings” -> “AF-Activation” -> “AF-ON Only” on Nikon).

    But you have to be careful when recomposing your shots after focusing, especially when dealing with shallow depth of field. If you focus and then recompose, your focus plane will change, potentially resulting in an out-of-focus subject, so keep this in mind.

    Use the “AF-Assist” feature

    It is there for a reason – use it every time you have problems focusing in low-light. To activate it, make sure that “AF-Assist” is turned on in your camera menu and the AF-S mode is selected. If you have a Nikon Z mirrorless camera, make sure that the “Low-light AF” option is turned on as well. And don’t forget about using a Speedlight in extremely low-light environments.

    Look for contrast and edges

    Instead of trying to focus on plain, one-colored subjects, look for “contrasty” subjects that stand out from the background.

    Add more light

    Sounds pretty basic, but if you are having problems focusing, what is simpler than adding a few more lights or turning more lights in the room? Lola and I were once photographing a corporate event and the ballroom was so dim, that we had a hard time getting good shots.

    We both switched to AF-S and were using our flashes for focusing, but high ceilings and lack of ambient light were making our images look very flat and dull. Lola then approached an event coordinator and simply asked her to turn up the lights and our problems all went away and we came back with beautiful pictures!

    Watch your shutter speed

    It might look like bad focus, but it might actually be a camera shake that causes your images to look soft. Using a camera with in-body image stabilization or a lens with optical image stabilization technology certainly helps, but still, make sure to keep your shutter speed relatively high. Check out my article on the reciprocal rule. If you have to work with slow shutter speeds, work on your hand-holding technique.

    Use live view contrast detection AF

    . Try focusing in Live View mode using Contrast Detection AF. It is much slower than Phase Detection AF, but certainly more reliable in low-light situations. Whenever I use a tripod, I always try to use Contrast Detection AF, because it gives me better and more accurate results. Even manually focusing is much easier in Live View mode, since you see a lot more on the larger LCD than inside the optical viewfinder. Not something you have to worry about on most mirrorless cameras though, since they automatically switch to Contrast Detection AF in low-light situations.

    Use a bright flashlight

    If your camera does not have a built-in AF-Assist lamp, use a bright flashlight and ask someone to point it at your subject while you try to focus. Switch to manual focus mode once focus is acquired, then ask your helper to turn off the flashlight and take a picture without you or your subject moving.

    Use manual focus

    It kind of goes against the title of this section, but you should still learn how to manually focus your lenses and not be afraid to do it from time to time.

    Sometimes manually focusing your lens is quicker than trying to use any of the autofocus methods or tricks. If you want to make some adjustments to the photo just let me know. I can do it for you at a very low cost. You can .

  • What is Exposure Compensation

    This article will discuss exposure compensation on digital cameras and how to use it to adjust exposure when shooting in different camera modes.

    Modern cameras have the ability to adjust exposure settings to properly expose images. Exposure compensation allows you to control the brightness of an image by adjusting it from too bright to too dark. 

    You can use a dedicated button or dial on your camera to adjust exposure compensation and take full control of your exposure.

    Let’s start by explaining how exposure compensation works on your camera and which modes it can be used in. To understand this better, we need to know about exposure, which is made up of ISO, shutter speed, and aperture – the three key settings in photography. Together, they create the exposure triangle.

    Exposure compensation meaning

    You can adjust the exposure settings of their camera using exposure compensation. This feature allows them to make images darker or brighter before capturing them, overriding the camera’s light meter.

    The camera’s light meter evaluates the light reflected off subjects and is calibrated to middle gray. When the camera is pointed at a dark subject, the meter will brighten the exposure, and when pointed at a bright subject, the meter will darken the exposure.

    To achieve a balanced image, it is important to aim for a middle gray tone. This helps prevent the image from being too dark or too bright. Although this method usually works well, it may not be effective in difficult lighting situations where the camera’s exposure settings are too extreme.

    This is when photographers can use Exposure Compensation to manually adjust the brightness of the image. By utilizing this feature on the camera, they can override the automatic exposure settings and take control of the image’s brightness.

    Here’s an instance where my camera’s metering system didn’t do a good job of exposing the scene correctly:

    When I was shooting in Aperture Priority mode, the camera’s meter ended up making the image underexposed. This happened because the scene was quite difficult – the sky and the white sand in the foreground were very bright. As a result, the camera ended up making the entire image darker, causing my subjects in the scene to appear too dark.

    By adjusting the Exposure Compensation feature on my camera to +1 EV (Exposure Value), I was able to fix the issue and capture a brighter image. The entire scene now appears properly exposed, surpassing the camera’s initial perception of brightness. This simple adjustment resolved the problem swiftly.

    Note: if you are wondering how different metering modes impact your images, please see our detailed article on Camera Metering Modes.

    How to use exposure compensation?

    To use exposure compensation, you need to be in a camera mode that uses the camera meter, like aperture priority, shutter priority, program mode, or a scene mode that adjusts exposure automatically.

    In Manual mode, exposure compensation won’t work unless Auto ISO is turned on. Once you’ve selected the right camera mode, you can adjust the image brightness using the exposure compensation feature.

    Now, where can you find the exposure compensation feature on a camera?

    Well, it varies depending on the make and model of the camera. Most cameras have a dedicated button on the top or back, while others may have it on a dial.

    To identify the exposure compensation button, look for a button with plus and minus signs, like the illustration shown above. If you are unable to locate the exposure compensation button, try looking for a dial on the camera’s top or back. This dial typically ranges from negative to positive values, like -3 to +3, with smaller increments in between.

    If you’re having trouble finding the exposure compensation button or dial, consult your camera manual for specific instructions. For Nikon DSLR users, the button is usually located near the shutter release. Canon DSLR users may find an “AV” button on the back of the camera.

    Some cameras, like mirrorless cameras with a retro design, have an exposure compensation dial on top. For dark images, you can dial a positive number (+EV), and for bright images, you can dial a negative number (-EV).

    If your camera has a button, you can hold it and rotate one of the thumb dials, or press it once and use the LCD screen to adjust the exposure value. If your camera has a dial, it’s even easier – just move it in the right direction and your exposure will be adjusted accordingly.

    DSLR cameras have an exposure compensation area in the viewfinder. When adjusting exposure, a bar will move left or right of the “0” value, showing negative or positive exposure compensation.

    If you’ve never used this feature, you may not see the area highlighted in red until an exposure compensation value is added.

    If you use a mirrorless camera, adjusting exposure compensation will change the brightness on the LCD and EVF. There will also be an information overlay showing the current exposure compensation value in one or multiple areas of the viewfinder.

    After adjusting exposure compensation, the +- EV values will be displayed on the LCD and EVF. If you can’t see these values, you may need to turn on informational overlays in the camera menu.

    Note: If you want to make some adjustments to the photo just let me know. I can do it for you at a very low cost. You can hire me to edit your photo.

    How exposure compensation works

    Exposure compensation changes exposure variables based on the camera mode. In Aperture Priority mode, the photographer selects the aperture, and the camera adjusts the shutter speed accordingly.

    By using exposure compensation, the photographer can override the camera’s shutter speed setting. Check out the example chart below for adjusting exposure in aperture priority mode.

    CAMERA METERED EXPOSURE (APERTURE PRIORITY)
    f/1.4f/2.0f/2.8f/4.0f/5.6
    1/10001/5001/2501/1251/60

    Decreasing the exposure by 1 EV will double the shutter speed from 1/250th to 1/500th of a second, with the aperture remaining the same.

    APERTURE PRIORITY, -1 EV EXPOSURE COMPENSATION
    f/1.4f/2.0f/2.8f/4.0f/5.6
    1/10001/5001/2501/1251/60

    When we decrease the amount of light reaching the sensor, the image becomes darker. However, if we increase the exposure value by +1, the image will be brighter and the shutter speed will be reduced, resulting in a brighter image.

    APERTURE PRIORITY, +1 EV EXPOSURE COMPENSATION
    f/1.4f/2.0f/2.8f/4.0f/5.6
    1/10001/5001/2501/1251/60

    When shooting in Shutter Priority mode, adjusting the exposure compensation will change the camera’s aperture, not the shutter speed. Begin with a base exposure of 1/250th of a second for the shutter speed.

    CAMERA METERED EXPOSURE (SHUTTER PRIORITY)
    f/1.4f/2.0f/2.8f/4.0f/5.6
    1/10001/5001/2501/1251/60

    Reducing exposure by 1 EV will change the aperture from f/2.8 to f/4.0 without affecting the shutter speed.

    SHUTTER PRIORITY, -1 EV EXPOSURE COMPENSATION
    f/1.4f/2.0f/2.8f/4.0f/5.6
    1/10001/5001/2501/1251/60

    Adjusting +1 EV will expand the aperture to f/2.0, resulting in a brighter image.

    SHUTTER PRIORITY, +1 EV EXPOSURE COMPENSATION
    f/1.4f/2.0f/2.8f/4.0f/5.6
    1/10001/5001/2501/1251/60

    In Manual Mode, the Camera ISO is the only thing that can be adjusted. However, it needs to be set to Auto ISO first, as mentioned before. The process is similar to the previous cases, except that the aperture and shutter speed stay the same.

    Adjusting exposure with sophisticated metering systems.

    While I mentioned earlier that camera metering systems typically use middle gray as a standard, newer cameras have advanced metering systems that can analyze scenes using preset data to adjust exposure without needing exposure compensation.

    Some cameras can detect people in photos and adjust the exposure based on their skin tones to avoid over or underexposure. This means that our cameras may need less manual intervention thanks to this feature.

    Even though our cameras are becoming smarter, it is still important to know how to make exposure adjustments quickly. This knowledge is valuable not only for future use but also for pushing the boundaries of your camera’s capabilities, such as using techniques like exposing to the right.

    Revealing on the right.

    While there is no universal standard for “proper exposure” in every scene, photographers often adjust the brightness of a scene based on what they want to convey. For example, intentionally darkening an image can highlight silhouettes. However, there are situations where exposure adjustments can be made using the exposure compensation feature to achieve the best results in every image.

    This technique, called “Exposing to the Right,” allows photographers to capture images that are as bright as possible without losing any important details. This ultimately leads to obtaining high-quality images.

    Please note that this technique is not recommended for beginners, as it requires shooting in RAW format instead of JPEG to achieve optimal results. If you’re interested in learning more about this topic, please refer to our article on Exposing to the Right.

    Note: If you want to make some adjustments to the photo just let me know. I can do it for you at a very low cost. You can hire me to edit your photo.

  • HOW TO POST-PROCESS PHOTOS

    How to post-process photos

    1. Crop and straighten the image

    While you should always check if the horizon is even before taking a photo, straightening is one of the first things you’ll have to do anyway.

    Start by cropping the photo to fix small compositional issues and removing some distracting objects at the edges of the shot.

    Photoshop’s crop function gives you plenty of control and allows you to straighten the photo, change the aspect ratio, fix perspective distortion, and fill in missing parts of an image using AI.

    In Lightroom, cropping is done in the Develop Module. To access that feature, simply press the “R” key.

    2. Adjust the exposure

    If you’re a newbie photographer, exposure mistakes are bound to happen frequently, with some of your photos being overexposed and others being underexposed. That’s why the second image post-processing step you need to take is adjusting exposure.

    In Lightroom, you can change the exposure by using one of the top sliders in the Develop module. Drag the slider around to either brighten or darken the photo. Below the main slider, there are also sliders for setting the exposure for specific light and darker picture areas.

    In Photoshop, you have to choose “Image” in the top panel, go to adjustments and exposure to access similar settings.

    3. Adjust Contrast

    Contrast deals with emphasizing the distinction between the lighter and darker photo areas. By raising the contrast, you can significantly enhance the impact an image has on a viewer, as the boundaries between different areas become more visible.

    If the contrast is very small, the photo will appear flat. In most cases, your goal is to find the golden balance between the two extremes.

    In Lightroom, you change the contrast by moving the appropriate slider under Exposure. Keep sliding it to the right until you’re satisfied with the result. Feel free to change the Blacks and Clarity settings too as they also affect contrast.

    In Photoshop, pick Image > Adjustments > Brightness/Contrast. Play around with the slider until you get the needed contrast.

    4. Shoot RAW

    The majority of DSLRs shoot in JPEG by default, but it’s better to change the go-to mode to RAW if you want to have more freedom for photography post-processing.

    RAW images preserve more details and brightness and have a higher dynamic range compared to JPEG. Moreover, enhancing poor images is a lot easier in RAW, as you can adjust the exposure, highlights, and shadows without having artifacts or noise appear.

    5. Fix the white balance

    White balance is determined by the color temperature of the lighting in a photo. If you carefully examine your images, you’ll often notice a color cast.

    To easily deal with that problem in Lightroom, select the dropper tool, and click the area of the image that has to be neutral white or grey. That will fix most color temperature problems.

    In Photoshop, you can correct white balance by picking Image > Adjustments > Color balance. Use the sliders to set the colorcast of the photo. Alternatively, you can visit the Image > Adjustment > Curves menu to achieve the same result. Pick the white dropper and click on the part that has to be white and you’ll see the tint disappear.

    6. Improve color vibrancy and saturation

    Once you’ve properly set white balance, it’s time to further improve the colors by using the saturation and vibrancy settings. The difference between the two tools is subtle.

    By raising vibrancy, you increase the intensity of neutral color shades and keep the intensity of brighter tones unchanged.

    You can also change separate colors if you want more control over the photo editing. The HSL (hue, saturation, luminance) sections in Lightroom or Photoshop are extremely powerful tools for enhancing colors.

    Alternatively, you can improve your photography post-processing workflow by getting high-quality Lightroom presets and Photoshop actions, that are great for achieving a professional look in a couple of clicks.

    7. Sharpen the image

    When taking photos in RAW, they aren’t sharpened by the camera, which means you have to increase the sharpness yourself.

    Lightroom: You’ll find the sharpening tools below the detail slider. The amount determines how much the image is sharpened. Radius defines if the sharpening occurs at the edges of the pixel or in the middle. The detail setting is used for fine-tuning as it focuses on the smaller details instead of the entire photo. Masking lets users decide which image parts the effect is used on.

    Photoshop: Select the Filter > Sharpen menu, which offers multiple varying options. The most commonly-used tools include unsharp mask

    and smart sharpening, both of which have amount and radius settings, just like Lr.

    Note: If you want to make some adjustments to the photo just let me know. I can do it for you at a very low cost. You can hire me to edit your photo.

    8. Use curves

    Curves are an intricate and very useful tool for post-processing photography. It can be used to adjust contrast, increase or decrease the brightness, make barely visible objects pop up more, tweak the colors, etc. You can alter the curves by going to the “Tone Curve” section of the develop module in Lightroom, or to Image > Adjustments > Curves in Photoshop.

    There are four different types of curves:

    • Highlights: The brightest parts of a photo.
    • Lights: Mostly lighter parts, but not as extreme. It covers the brighter part of the mid-tones.
    • Darks: The darker part of mid-tones, covering everything between the lights and the shadows.
    • Shadows: The darkest parts of a photo.

    9. Use dodge and burn

    This step is often covered in skin retouching tips. The Dodge and Burn tool let you brighten or darken certain parts of a photo. Dodge lightens the selected area, while burn does the opposite.

    It acts like a brush, so you have complete freedom in choosing where to apply the effect. Both options are included in Photoshop and can be found in the toolbar, while the menu on the top lets you select the range, exposure (how bright or dark the effect will be), and the size of the tool.

    10. Use frequency separation for skin retouching

    Frequency separation is the first technique you’ll see covered in any guide on how to smooth skin in Photoshop. It entails a complicated process of separating the colors and textures of a photo into distinct layers, giving you the freedom to tweak them individually.

    High frequency covers hair, texture, pore, fine line, and skin imperfection data. Low frequency covers data on shadows, tones, and colors.

    Dividing the information into separate layers allows you to alter some of the aspects of a photo without affecting the rest of them, which can be crucial when learning how to post-process photos. You’ll be able to smoothen the skin without changing its color. As another example, you can brighten shadows without affecting the texture. Due to the precision this technique offers, it’s often used in high end retouching.

    11. Remove unwanted objects

    One of the most useful aspects of post-processing for photographers is the ability to delete objects that don’t belong to a scene. You have to learn how to remove stray hairs in Photoshop, random people walking, distracting spots, and light flares.

    Most professionals perform this type of image editing in Photoshop. It offers the handy clone stamp and healing brush tools, which are perfect for object removal. Healing brush offers 2 options: one where you establish a reference area, and the second one where the AI automatically adjusts the selected area according to the surrounding pixels.

    Lightroom can’t offer the same amount of control, but its spot deletion tool can be used similarly and is more than enough for simple adjustments.

    12. Use adjustments layers and brushes

    Adjustment layers and brushes take all of the changes that could affect the whole photo and limit them to a selected area.

    Adjustment layers in Photoshop apply changes to a layer, not the photo itself. You can add them by selecting Layer > New Adjustment Layer and picking one of the available options like exposure or vibrancy.

    Layer masks are similar in function and allow applying an effect only to the selected image area. Learning how to mask in Photoshop is a fast and simple process: at the bottom of the Layers menu, pick the white square with a black circle to add such a mask.

    Even though Lightroom doesn’t have as many tools for precise image editing, its adjustment brush works similarly. Once you’ve chosen it, you can move around various sliders to pick what exactly you want to change, then apply the effect over the needed image areas. For instance, you can use a brush for teeth whitening. Learn more about technicolor white and black.

    Note: If you want to make some adjustments to the photo just let me know. I can do it for you at a very low cost. You can hire me to edit your photo.

  • RETOUCH TIPS FOR PHOTOGRAPHERS

    10 best retouch tips for photographers

    1. Eliminate skin imperfections

    Acne, wrinkles or scars on the face significantly ruin the impression of portrait photography. However, even these disadvantages can be eliminated by applying Photoshop tools.

    With the healing brush, it is possible to restore sections of shots using the appropriate fragments taken as a sample. The spot healing brush tool automatically selects pixel samples from the area around the retouched fragment.

    To achieve smooth skin, I suggest resorting to the frequency separation technique. It separates the texture in the shot from its tone and color. As a result, you will be able to tweak particular areas, and apply Gaussian Blur to smoothen the skin and retain its natural texture.

    2. Make the eyes more expressive

    Regardless of whether the makeup is present or not, the eyes are supposed to be the most expressive part of the face. You will need to lighten the whites of the eyes but it has to be done carefully so that they don’t appear unnaturally white.

    To increase the visibility of highlights and borders, add sharpness. These techniques are often used in fashion photography.

    Paint in the masks that you have created to slightly raise the brightness of the bottom part of the eyes, around the iris. A subtle touch on the catchlights for a brighter effect won’t hurt either.

    3. Emphasize or add lashes

    Thick and beautiful lashes are another way to make your eyes more expressive and a crucial part of the makeup retouching process. For this task, try the dry media brushes bundle. They aren’t only high-resolution but also full of detail and boast rich textures.

    Add lashes along their natural growth line and stick to the needed curve. Switch between different brush thickness and intensity values to achieve natural shapes. Also, don’t draw all the lashes at the same length, otherwise, they will appear artificial.

    4. Make the eyebrows neat

    This retouch makeup point requires you to be extra careful, as it is important to remove excessive hair without making the eyebrows unnaturally accurate. To eliminate all unnecessary elements, apply the Spot Healing Brush tool mentioned above.

    Moreover, you can add the missing hairs using the appropriate brushes. Once the excessive hair is eliminated, cover up the “bare” areas with the Stamp Tool (S). Then, hold Alt for cloning bunches of hair prior to painting them onto each brow.

    The next step would be to apply the Burn Tool (O) to make each shape darker and more intense. Portrait photographers often take advantage of such tricks.

    5. Fix the texture of the lips

    Makeup doesn’t look very neat on dry and cracked lips, and portrait photography will only emphasize the undesired effect. Therefore, you should carefully work on the texture of the lips while manipulating makeup in Photoshop.

    The defects may be eliminated using the clone stamp tool. In the same way, you will be able to correct the contour of the lips, copying clean areas of skin. The next step would be to align the light and shade on the lips. To do this, you need to raise the curve on the adjustment layer.

    With a white brush of a small radius and slight transparency, you will be aligning the light and shade over the entire surface of the lips. In addition, you should pay attention to the color of the teeth. Learn how to whiten teeth in Photoshop by means of this guide.

    6. Make the makeup brighter

    The camera often dims the colors, so you need to add brightness and saturation to make up Photoshop. For this task, you will have to resort to several adjustment layers. Mind that the intensity of makeup should match the overall atmosphere of the shot.

    The suggested adjustment layers are Curves, Gradient Map, and Levels. To begin with, adjust contrast via Curves. After that, settle on Luminosity for a gray Gradient Map. Pay attention to other peculiarities of editing pictures of this genre that are covered in my selection of portrait tutorials.

    7. Add contour and highlights

    To achieve realistic makeup for Photoshop, you need to figure out how it is actually applied in real life. Skillful makeup artists and regular people put on makeup in order to contour and highlight facial features. Dark shades are necessary for defining the bone structure.

    That’s exactly what you have to do while performing makeup retouch. A new layer should be adjusted to soft light. Then proceed to paint a lighter skin tone color with a soft round brush to the parts marked in the picture below.

    A second new layer should be adjusted to linear burn. Use this layer to make the cheekbones more defined by means of faded purple color. One of the essential stages of professional makeup retouching is figuring out how to smooth skin in Photoshop.

    8. Create eyes makeup

    It is possible to add makeup to photo in Photoshop if it is absent on the actual face. Using the adjustments tool, try creating shadows by darkening the outer corner of the eye and adding shine.

    Pick a hard round brush to achieve a neater black eyeliner. For the eyeshadows, reduce the hardness value to 0%. I would like to warn you against painting with a brown color. Layer blend modes will result in brown shades appearing with a profound red undertone.

    For a more eye-catching effect, discover how to change eyes color in Photoshop.

    9. Create eyebrows makeup

    To achieve a sharper line across the upper part of the eyebrows, I suggest picking the Pen tool (P) and drawing a path across that area. Then finish the selection (the video will show you how to do it step-by-step). Press Ctrl + Enter (Windows) or Cmd + Return (Mac) to load the path as a selection.

    The next step of the eyebrow makeup retouch would be to pick the Lasso tool (L). Using the arrow keys, push the selection downward for overlapping some of the eyebrow hair. After that, create a new layer, pick the Healing Brush tool, and take fragments of the skin from above the eyebrows on the forehead as a sample.

    10. Add gloss to the lips

    Using the solid color tool in the color overlay mode, it is possible to add the desired shade to the lips. To make the lips more voluminous, take advantage of the Dodge&Burn option as part of Photoshop make up retouching.

    In order to quickly add gloss and contrast to lips, create two new layers first. Then pick a very small brush and try painting over the brighter areas of lips with white on one of the new layers. On the other layer, paint over the shaded areas with black.

    Click Filter>Gaussian Blur to blur these two layers by a couple of pixels. After that, these two layers should be adjusted to the blend mode Soft Light. The last step of the process would be to lower the opacity until you are satisfied with the result.

  • Understanding ISO, Shutter Speed, and Aperture

    ISO, Shutter Speed, and Aperture: A complete guide

    • Shutter Speed – the length of time a camera shutter is open to expose light into the camera sensor. Shutter speed in photography are typically measured in fractions of a second when they are under a second. Slow shutter speeds allow more light into the camera sensor and are used for low-light and night photography, while fast shutter speeds help to freeze motion. Examples of shutter speeds: 1/15 (1/15th of a second), 1/30, 1/60, 1/125.
    • Aperture – a hole within a lens, through which light travels into the camera body. The larger the hole, the more light passes to the camera sensor. Aperture also controls the depth of field, which is the portion of a scene that appears to be sharp. If the aperture is very small, the depth of field is large, while if the aperture is large, the depth of field is small. In photography, the aperture is typically expressed in “f” numbers (also known as “focal ratio”, since the f-number is the ratio of the diameter of the lens aperture to the length of the lens). Examples of-numbers are f/1.4, f/2.0, f/2.8, f/4.0, f/5.6, f/8.0.
    • ISO – a way to brighten your photos if you can’t use a longer shutter speed or a wider aperture. It is typically measured in numbers, a lower number representing a darker image, while higher numbers mean a brighter image. However, raising your ISO comes at a cost. As the ISO rises, so does the visibility of graininess/noise in your images. Examples of ISO: 100, 200, 400, 800, 1600.

    Also, take a look at this article if you would like to understand what exposure actually means.

    And if you’re more of a visual learner, we recently published a comprehensive, beginner-friendly video on this exact same topic:

    1) How do shutter speed, aperture and ISO work together to create an exposure?

    To have a good understanding about exposure and how shutter speed, aperture and ISO affect it, we need to understand what happens within the camera when a picture is taken.

    As you point your camera at a subject and press the shutter button, the subject gets into your camera lens in a form of light. If your subject is well-lit, there is plenty of light that travels into the lens, whereas if you are taking a picture in a dim environment, there is not much light that travels into the lens.

    When the light enters the lens, it passes through various optical elements made of glass, then goes through the lens “Aperture” (a hole inside the lens that can be changed from small to large). Once the light goes past the lens aperture, it then hits the shutter curtain, which is like a window that is closed at all times, but opens when needed.

    The shutter then opens in a matter of milliseconds, letting the light hit the camera sensor for a specified amount of time. This specified amount of time is called “Shutter Speed” and it can be extremely short (up to 1/8000th of a second) or long (up to 30 seconds). The sensor then gathers the light, and your “ISO” brightens the image if necessary (again, making grain and image quality problems more visible). Then the shutter closes and the light is completely blocked from reaching the camera sensor.

    To get the image properly exposed, so that it is not too bright or too dark, Shutter Speed, Aperture and ISO need to play together. When lots of light enters the lens (let’s say it is broad daylight with plenty of sunlight), what happens when the lens aperture/hole is very small? Lots of light gets blocked. This means that the camera sensor would need more time to collect the light.

    What needs to happen for the sensor to collect the right amount of light?

    That’s right, the shutter needs to stay open longer. So, with a very small lens aperture, we would need more time, i.e. longer shutter speed for the sensor to gather enough light to produce a properly exposed image.

    Now what would happen if the lens aperture/hole was very big? Obviously, a lot more light would hit the sensor, so we would need a much shorter shutter speed for the image to get properly exposed. If the shutter speed is too low, the sensor would get a lot more light than it needs and the light would start “burning” or “overexposing” the image, just like magnifying glass starts burning paper on a sunny day.

    The overexposed area of the image will look very bright or pure white. In contrast, if the shutter speed is way too high, then the sensor is not able to gather enough light and the image would appear “underexposed” or too dark.

    Let’s do a real-life example. Grab your camera and set your camera mode to “Aperture Priority“. Set your lens aperture on your camera to the lowest possible number the lens will allow, such as f/1.4 if you have a fast lens or f/3.5 on slower lenses. Set your ISO to 200 and make sure that “Auto ISO” is turned off.

    Now point your camera at an object that is NOT a light source (for example a picture on the wall) then half-press the shutter button to acquire correct focus and let the camera determine the optimal exposure settings. Do not move your camera and keep pointing at the same subject! If you look inside the camera viewfinder now or on the back LCD, you should see several numbers.

    One of the numbers will show your aperture, which should be the same number as what you set your aperture to, then it should show your shutter speed, which should be a number such as “125” (means 1/125th of a second) and “200”, which is your sensor ISO.

    Nikon D5000 Viewfinder

    Write down these numbers on a piece of paper and then take a picture. When the picture comes up on the rear LCD of your camera, it should be properly exposed. It might be very blurry, but it should be properly exposed, which means not too bright or too dark. Let’s say the settings you wrote down are 3.5 (aperture), 125 (shutter speed) and 200 (ISO).

    Now change your camera mode to “Manual Mode“. Manually set your aperture to the same number as you wrote down, which should be the lowest number your camera lens will allow (in our example it is 3.5). Then set your shutter speed to the number you wrote down (in our example it is 125) and keep your ISO the same – 200. Make sure your lighting conditions in the room stay the same.

    Point at the same subject and take another picture. Your results should look very similar to the picture you took earlier, except this time, you are manually setting your camera shutter speed, instead of letting your camera make the guess. Now, let’s block the amount of light that is passing through the lens by increasing the aperture and see what happens.

    Increase your aperture to a larger number such as “8.0” and keep the rest of the settings the same. Point at the same subject and take another picture. What happened? Your image is too dark or underexposed now! Why did this happen? Because you blocked a portion of the light that hits the sensor and did not change the shutter speed.

    Because of this, the camera sensor did not have enough time to gather the light and therefore the image is underexposed. Had you decreased the shutter speed to a smaller number, this would not have happened. Understand the relationship?

    Now change your aperture back to what it was before (smallest number), but this time, decrease your shutter speed to a much smaller number. In my example, I will set my shutter speed to 4 (quarter of a second) from 125. Take another picture. Now your image should be overexposed and some parts of the image should appear too bright. What happened this time? You let your lens pass through all the light it can gather without blocking it, then you let your sensor gather more light then it needs by decreasing the shutter speed. This is a very basic explanation of how aperture and shutter speed play together.

    So, when does ISO come into play and what does it do? So far, we kept the ISO at the same number (200) and didn’t change it. Remember, ISO means sensor brightness. Lower numbers mean lower brightness, while higher numbers mean higher brightness. If you were to change your ISO from 200 to 400, you would be making the photo twice as bright.

    In the above example, at aperture of f/3.5, shutter speed of 1/125th of a second and ISO 200, if you were to increase the ISO to 400, you would need twice less time to properly expose the image. This means that you could set your shutter speed to 1/250th of a second and your image would still come out properly exposed.

    Try it – set your aperture to the same number you wrote down earlier, multiply your shutter speed by two and set it to that number, then change your ISO to 400. It should look the same as the first image you took earlier. If you were to increase the ISO to 800, you would need to again double your last shutter speed from 1/250 to 1/500.

    As you can see, increasing ISO from 200 to 800 will allow you to shoot at higher shutter speeds and in this example increase it from 1/125th of a second to 1/500th of a second, which is plenty of speed to freeze motion. However, increasing ISO comes at a cost – the higher the ISO, the more noise or grain it will add to the picture.

    Basically, this is how the Three Kings work together to create an exposure. I highly recommend practicing with your camera more to see the effects of changing aperture, shutter speed and ISO.

    Note: If you want to make some adjustments to the photo just let me know. I can do it for you at a very low cost. You can hire me to edit your photo.

    2) What camera mode should I be using?

    As I pointed out in my “Understanding Digital Camera Modes” article, I recommend using the “Aperture Priority” mode for beginners (although any other mode works equally well, as long as you know what you are doing). In this mode, you set your lens aperture, while the camera automatically guesses what the right shutter speed should be.

    This way, you can control the depth of field in your images by changing the aperture (depth of field also depends on other factors such as a camera to subject distance and focal length). There is absolutely nothing wrong with using “Auto” or “Program” modes, especially considering the fact that most modern DSLRs give the photographer pretty good control by allowing to override the shutter speed and aperture in those modes.

    But most people get lazy and end up using the Auto/Program modes without understanding what happens inside the camera, so I highly recommend learning how to shoot in all camera modes.

    3) What ISO Should I Set My Camera To?

    If your camera is equipped with an “Auto ISO” feature (known as “ISO Sensitivity Auto Control” on Nikon bodies), you should enable it, so that the camera automatically guesses what the right ISO should be in different lighting conditions.

    Auto ISO is worry-free and it works great for most lighting conditions! Set your “Minimum ISO/ISO Sensitivity” to 100 on Canon cameras and 200 on latest Nikon cameras, then set your “Maximum ISO/Maximum Sensitivity” to 800 or 1600 (depending on how much noise you consider acceptable).

    Set the “Minimum Shutter Speed” to 1/100th of a second if you have a short lens below 100mm and to a higher number if you have a long lens. Basically, the camera will watch your shutter speed and if it drops below the “Minimum Shutter Speed”, it will automatically increase the ISO to a higher number, to try to keep the shutter speed above this setting.

    The general rule is to set your shutter speed to the largest focal length of your lens. For example, if you have a Nikon 70-300mm f/4.5-5.6 zoom lens, set your minimum shutter speed to 1/300th of a second. Why? Because as the focal length of the lens increases, so do the chances of having a camera shake that will render your images blurry.

    But this rule doesn’t always work, because there are other factors that all play a role in whether you will introduce camera shake or not. Having shaky hands and improperly holding the camera might cause extra camera shake, while having a lens with Vibration Reduction (also known as Image Stabilization) might actually help to decrease camera shake. Either way, play with the “Minimum Shutter Speed” option and try changing numbers and see what works for you.

    Auto ISO on Nikon

    If you do not have an “Auto ISO” option in your camera, then start out with the lowest ISO and see what shutter speeds you are getting. Keep on increasing the ISO until you get to an acceptable shutter speed.

    4) Exposure compensation

    Another great feature of all modern DSLRs, is the ability to control the exposure by using the “exposure compensation” feature. Except for manual mode, exposure compensation works great for all camera modes.

    Whether you are shooting in Aperture Priority, Shutter Priority or Auto/Program modes, dialing the exposure compensation up or down (plus to minus) will allow you to regulate the exposure and override the camera-guessed settings.

    If you find your image (or parts of your image) underexposed or overexposed, you can use exposure compensation to adjust the exposure without manually changing the aperture or shutter speed.

    5) Should I use flash or increase ISO?

    It really depends on what you are taking a picture of. Sometimes it is not possible to use your built-in camera flash in a low-light environment. For example, if your subject is standing far away, you might not be able to reach the subject with your flash.

    In that case, the only solution is to either come closer to the subject, or turn off flash completely and use a higher ISO. Obviously, for landscape or architectural photography, you should always turn off your flash, because it will not be able to brighten up the entire scene.

    So in a low-light situation, the only two options are to either increase the ISO so that you can shoot hand-held, or set the camera to the lowest ISO and use a tripod.

    6) What are “full stops”?

    Have you ever heard of a term “full stop” in photography? Each of the increments between ISO numbers is called “a full stop” in photography. For example, there is one full stop between ISO 100 and ISO 200, while there are two full stops between ISO 100 and ISO 400. How many stops are there between ISO 100 and ISO 1600? That’s right, four full stops of light.

    Why do you need to know about stops? Because you might see it in photography literature or photographer might mention stops and it is sometimes confusing to understand what it truly means. But the term “full stop” does not just apply to ISOs – the same concept is there for shutter speed and aperture. It is easy to remember full stops between shutter speeds because you just start from one and divide the number by two: 1, 1/2, 1/4, 1/8, 1/15, 1/30, 1/60, 1/125, 1/250, 1/500, 1/1000, etc.

    Obviously, the numbers are rounded (starting from 1/15, which should be 1/16) to make it easy for photography. It is harder to memorize stops in apertures, because the numbers are computed differently: f/1, f/1.4, f/2, f/2.8, f/4, f/5.6, f/8, f/11, f/16, etc. To read more about stops, please see our detailed Exposure Stops article.

    7) Specific examples and case scenarios

    Let’s now go over what you could do in your camera to properly expose an image in different lighting conditions.

    What should I do in low-light situations?

    Use Aperture-Priority mode, set your aperture to the lowest possible number. Be careful if you have a fast lens such as Nikon 50mm f/1.4 because setting aperture to the lowest number (f/1.4) will make the depth of field very shallow. Set your “Auto ISO” to “On” (if you have it) and make sure that the maximum ISO and minimum shutter speed are both defined, as shown in section 3. If after increasing your ISO you are still getting small shutter speeds (which means that you are in a very dim environment), your only other options are to either use a tripod or a flash. If you have moving subjects that need to be “frozen”, you will have to use flash.

    What do I need to do to freeze the action?

    First, you will need plenty of light. Freezing action during broad daylight is easy, whereas it is extremely tough to do it in low-light situations. Assuming you have plenty of light, make sure that your aperture is set to the lowest number (again, be careful about depth of field), then set your “Auto ISO” to “On” (if you have it) and set your minimum shutter speed to a really high number such as 1/500th or 1/1000th of a second. For my bird photography, I try to keep shutter speeds at 1/1000th of a second and faster.

    What settings do I need to change to create a motion blur effect?

     Turn off Auto ISO and set your ISO to the lowest number. If the shutter speed is too fast and you still cannot create motion blur, increase the aperture to a higher number until the shutter speed drops to a low number below 1/100-1/50 of a second.

    What do I do if I cannot get proper exposure? The image is either too dark or too bright.

    Make sure that you are not shooting in Manual Mode. Set your camera meter to “Evaluative” (Canon) or “Matrix” (Nikon). If it is already set and you are still getting improper exposure, it means that you are probably taking a picture where there is a big contrast between multiple objects (for example bright sky and dark mountains, or sun in the frame) – whatever you are trying to take a picture of is confusing the meter within your camera. If you still need to take a picture, set your camera meter to “Spot” and try to point your focus point to an area that is not too bright or too dark. That way you get the “sweet middle”.

    How can I isolate my subject from the background and make the background (bokeh) look soft and smooth?

    Stand closer to your subject and use the smallest aperture on your lens. Some lenses can render the background much better and smoother than others. If you do not like the bokeh on yours, consider getting a good portrait lens such as the Nikon 50mm f/1.4 or the Nikon 85mm f/1.4, which is considered to be one of the best lenses when it comes to bokeh.

    How can I decrease the amount of noise/grain in my images?

    Turn off “Auto ISO” and set your ISO to the base ISO of the camera (ISO 100 on Canon and ISO 200 on Nikon).

    Note: If you want to make some adjustments to the photo just let me know. I can do it for you at a very low cost. You can hire me to edit your photo.

  • What is ISO? The Complete Guide for Beginners

    ISO is one of the three pillars of photography (the other two being shutter speed and aperture), and it has a major effect on your images. How does camera ISO affect your images? In this article, we will introduce ISO for beginners and explain how to use it effectively for the best possible results.

    What is ISO?

    In very basic terms, ISO is simply a camera setting that will brighten or darken a photo. As you increase your ISO number, your photos will grow progressively brighter. For that reason, ISO can help you capture images in darker environments, or be more flexible about your aperture and shutter speed settings.

    However, raising your ISO has consequences. A photo taken at too high of an ISO will show a lot of grain, also known as noise, and might not be usable. So, brightening a photo via ISO is always a trade-off. You should only raise your ISO when you are unable to brighten the photo via shutter speed or aperture instead (for example, if using a longer shutter speed would cause your subject to be blurry).

    What is the meaning of ISO?

    The acronym ISO stands for “International Organization for Standardization”. However, camera ISO does not directly refer to the organization that creates various technology and product standards. Ever since two film standards called ASA and DIN were combined into ISO standards in 1974 (later revised for both film and digital photography), they were referred to as one word “ISO” from that point on. Although ISO initially defined only film sensitivity, it was later adopted by digital camera manufacturers with the purpose of maintaining similar brightness levels as film.

    Common ISO values

    Every camera has a different range of ISO values (sometimes called ISO speeds) that you can use. A common set is as follows:

    • ISO 100 (low ISO)
    • ISO 200
    • ISO 400
    • ISO 800
    • ISO 1600
    • ISO 3200
    • ISO 6400 (high ISO)

    Quite simply, when you double your ISO speed, you are doubling the brightness of the photo. So, a photo at ISO 400 will be twice brighter than ISO 200, which will be twice brighter than ISO 100.

    What is base ISO?

    The lowest native ISO on your camera is your “base ISO”. This is a very important setting, because it gives you the potential to produce the highest image quality, minimizing the visibility of noise as much as possible. Some older DSLRs and a number of modern cameras, such as the Fuji X-T2 have a base ISO of 200, whereas most modern digital cameras have a base ISO of 100. Optimally, you should always try to stick to the base ISO to get the highest image quality. However, it is not always possible to do so, especially when working in low-light conditions.

    Side note:

    Some cameras have extended “HI” and “LO” values for ISO that might stretch beyond their native range. However, these are completely simulated and lower your image quality. We recommend avoiding them.

    Low vs High ISO noise visibility

    To give an example of two photos taken at different ISO values, take a look at the comparison below. Pay attention to the level of noise (graininess and blotchy colors) in the images:

    The difference is clear – the image at ISO 3200 has much more noise than the one at ISO 200 (which I brightened with a long shutter speed instead). This is why you should avoid high ISOs whenever possible, unless conditions require you to use them.

    How to change ISO

    Changing ISO varies from camera to camera. Here are some common ways to change ISO:

    • To start, enter a mode that lets you select the ISO yourself. Get out of Auto mode, and go to Manual, Shutter Priority, Aperture Priority, or Program (we tend to prefer Aperture Priority or Manual).
    • For entry-level DSLRs and mirrorless cameras, you probably need to open a menu (possibly the “quick menu”) and find the section for ISO. Select the value you want, or set it to Auto.
    • For higher-end cameras, there may be a dedicated “ISO” button on the camera. Press it while spinning one of the wheels to change your ISO setting. If you don’t see a button labeled “ISO”, it is still possible that your camera will let you program one to perform this task.
    • Other cameras may have a dedicated wheel that already has various ISO settings marked. This makes things even easier.

    Check your camera manual if you still aren’t sure. However, it is worth being very familiar with how to change your ISO setting quickly, since it’s something you will likely be adjusting quite often, especially if you shoot in low light conditions without a tripod or flash.

    What camera ISO should you use?

    Many photographers understand the basics of ISO, but they aren’t sure which ISO value to actually pick in the field. In practice, there’s a reason why your camera allows such a wide range of ISO settings: Different situations call for different ISOs. Below, we will cover some of the common scenarios you may come across.

    When to use low ISO

    As discussed above, you should always try to stick to the lowest ISO (base ISO) of your camera, which is typically ISO 100 or 200, whenever you can. If there is plenty of light, you are free to use a low ISO and minimize the appearance of noise as much as possible.

    Even in dim or dark environments, you still might be able to use a low ISO. For example, if you have your camera mounted on a tripod or sitting completely still on a table. In that case, you can safely use a ghgdw low ISO and brighten your photo via a long shutter speed instead, since you won’t introduce camera shake. However, keep in mind that if your camera does use a long shutter speed, anything that is moving will look like a ghost:

    Just kidding, of course! That’s my lovely nephew being the subject of my long exposure test. I set the camera to the lowest ISO to retain the detail, which required a long shutter speed of five seconds in order to capture a bright enough photo. My nephew sat still, while my friend stepped in for a brief moment to introduce the ghost.

    Note: If you want to make some adjustments to the photo just let me know. I can do it for you at a very low cost. You can hire me to edit your photo.

    When to use high ISO

    Even though it is ideal to use low ISOs, there will be plenty of times when a high ISO is necessary in order to take a good photo in the first place. The simple reason is that you are often fighting against motion blur, and you will need to pick between a sharp photo at a high ISO, or a blurry photo at a low ISO. Take a look at the image below:

    I captured these Black Skimmers at 1/2000th of a second and ISO 800. Here, my camera needed 1/2000th of a second to fully freeze the birds while they were in flight. What would have happened if I had set ISO 100 on my camera instead? I would have needed a shutter speed of 1/250th of a second to capture a bright photo. At that setting, there would have been a lot of unwanted motion blur in the picture, since the birds were moving so fast. In short, I would have ruined the picture.

    The bottom line is that you should increase the ISO when there is not enough light for the camera to capture a sharp, bright photo any other way. When I shoot handheld photos indoors without a flash, I always set my ISO to a higher number to capture the moment without introducing blur. Or, when photographing ultra-fast action like in the bird picture above, raising your ISO is often necessary.

    On most cameras, there is a setting for Auto ISO, which works great in low-light environments. The beauty of this setting is that you input the maximum ISO you are willing to use, so that the camera does not cross that limit. Personally, if I want to limit the amount of noise in a photo, I will set my maximum ISO to something like ISO 800, 1600, or 3200. The downside is that the camera will start using progressively longer shutter speeds if it reaches these ISO limits, which leads to more motion blur. Everything is a trade-off!

    Minimizing noise and maximizing image quality

    Some photographers think that the best way to capture high-quality images is to use Base ISO 100% of the time. However, as demonstrated above, that simply is not true. Sometimes, you’ll be in dark environments when you have no choice but to use a higher ISO.

    You should only use base ISO when there is enough light to do so. Don’t try to force ISO 100 in a dark environment, or your photos will come out way too dark. Similarly, if you’re using a fast shutter speed to capture action, it’s essentially the same as taking pictures in a dark environment (since you strictly limit the amount of time your camera sensor is able to capture light). So, for certain types of sports and action photography, a high ISO might be your only option.

    To maximize your image quality, here are the four steps you need to follow:

    1. Select the aperture setting that will provide your desired depth of field.
    2. Set your ISO to its base value, and put your shutter speed to whatever setting provides a proper exposure.
    3. If your subject is blurry, progressively raise your ISO and use a faster shutter speed until motion blur disappears.
    4. If your ISO is getting too high and you still have the ability to use a wider aperture, open it up until the ISO gets to a more manageable level, even if it means sacrificing some of your desired depth of field.

    That’s all it takes! If you follow these steps, you’ll capture the maximum image quality each time. You’ll find the ideal balance between noise, motion blur, and depth of field.

    Common ISO myths and misconceptions

    ISO has a lot of myths surrounding it, including some that are quite common to hear. In this section, we will quickly address some of those concerns so that you are not misled about this topic in the future.

    Is ISO “Sensor Sensitivity”?

    This is the most common myth related to ISO. It is something you will see all over the web (and in print). However, although it may help you to think of ISO as “acting like” camera sensor sensitivity, that’s not what it actually does. Instead, digital sensors only have a single sensitivity, regardless of your ISO. It is more accurate to say that ISO is like a mapping to tell your camera how bright the output photo should be, given a particular input exposure.

    Is ISO Part of Exposure?

    No, ISO is not part of exposure. Shutter Speed and Aperture brighten your photo by physically capturing more light. ISO doesn’t do that; instead, it essentially brightens the photo you already captured. So, photographers don’t consider it to be a component of exposure.Is

    Raising ISO just like brightening your photo on a computer?

    This is a clever question, but, again, it is simply a misconception. Brightening a photo on your computer can act in many ways like raising your ISO, since it does make noise more visible (and it leads to a brighter image). But the simple difference is that raising your ISO in the camera nearly always provides better image quality than brightening a photo on your computer. In other words, it is better to use ISO 800 when necessary, rather than brightening an ISO 100 photo to a huge degree in post-processing software like Lightroom!

    How does ISO affect a photo?

    ISO increases or decreases the brightness of a photograph, but also affects both grain / noise levels and dynamic range. At the lowest (base) ISO setting, your images will have the least amount of noise and the highest dynamic range, giving you the most flexibility in post-processing. As ISO is increased, noise levels increase and dynamic range typically decreases as well. What is the Best ISO Setting for Low-Light?

    When shooting in low-light conditions, your shutter speed will typically decrease, resulting in camera shake or motion blur. To avoid such issues, you should increase ISO setting to a higher value, such as ISO 1600. Depending on your aperture and light conditions, you might need to increase ISO even more.

    What is the best ISO setting for landscape photography?

    When photographing landscapes, you should use a tripod and set your ISO to your camera’s base ISO, which is typically 100.

    low cost image editing services click here

    Note: If you want to make some adjustments to the photo just let me know. I can do it for you at a very low cost. You can hire me to edit your photo.

  • Introduction to Shutter Speed in Photography

    One of the three most important settings in photography is Shutter Speed, the other two being Aperture and ISO. Shutter speed is responsible for two particular things: changing the brightness of your photo and creating dramatic effects by either freezing action or blurring motion. In the following article, we will explain everything you need to know about it in very simple language.

    Shutter speed exists because of the camera shutter – which is a curtain in front of the camera sensor that stays closed until the camera fires. When the camera fires, the shutter opens and fully exposes the camera sensor to the light that has passed through your lens. After the sensor is done collecting the light, the shutter closes immediately, stopping the light from hitting the sensor. The button that fires the camera is also called “shutter” or “shutter button,” because it triggers the shutter to open and close.

    What is shutter speed?

    Shutter speed is the length of time the camera shutter is open, exposing light onto the camera sensor. Essentially, it’s how long your camera spends taking a photo. This has a few important effects on how your images will appear.

    When you use a long shutter speed, you end up exposing your sensor for a significant period of time. The first big effect of it is motion blur. If your shutter speed is long, moving subjects in your photo will appear blurred along the direction of motion. This effect is used quite often in advertisements of cars and motorbikes, where a sense of speed and motion is communicated to the viewer by intentionally blurring the moving wheels.

    Slow shutter speeds are also used to photograph the Milky Way or other objects at night, or in dim environments with a tripod. Landscape photographers may intentionally use long shutter speeds to create a sense of motion on rivers and waterfalls while keeping everything else completely sharp.

    On the other hand, shutter speed can also be used to do just the opposite – freeze motion. If you use an especially fast shutter speed, you can eliminate motion even from fast-moving objects, like birds in flight, or cars driving past. If you use a fast shutter speed while taking pictures of water, each droplet will hang in the air completely sharp, which might not even be visible to our own eyes.

    All of the above is achieved by simply controlling the shutter speed. In summary, quick shutter speeds freeze action, while long ones create an effect of motion when you photograph moving objects.

    How shutter speed is measured

    Shutter speeds are typically measured in fractions of a second when they are under a second. For example, 1/4 means a quarter of a second, while 1/250 means one-two-hundred-and-fiftieth of a second (or four milliseconds).

    Most modern DSLRs and mirrorless cameras can handle shutter speeds of up to 1/4000th of a second, while some can handle much quicker speeds of 1/8000th of a second and faster. On the other hand, the longest available shutter speed on most DSLRs or mirrorless cameras is typically 30 seconds. You can use a longer shutter speed by using external remote triggers, if necessary.

    Shutter speed and exposure

    The other important effect of shutter speed is on exposure, which relates to the brightness of an image. If you use a long shutter speed, your camera sensor gathers a lot of light, and the resulting photo will be quite bright. By using a quick shutter speed, your camera sensor is only exposed to a small fraction of light, resulting in a darker photo.

    However, shutter speed is not the only variable that affects the brightness of an image. There are also Aperture and ISO, along with the actual brightness of the scene in front of you. So, you have some flexibility when you’re deciding on a shutter speed, but you need to pick your other settings carefully.

    Shutter speed can be a vital tool to capture a photo of the proper brightness. On a sunny day, you may need to use a fast shutter speed so that your photo isn’t overexposed. Or, if it is dark out, a long shutter speed may be necessary to avoid a photo that is too dark (which, in turn, could require a tripod, due to motion blur from handholding the camera). For many people, this is the main reason to adjust shutter speed: to make sure your photos are the proper brightness. Still, motion blur concerns are also very important, and should not be overlooked.

    Fast, slow and long shutter speeds

    A fast shutter speed is typically whatever it takes to freeze action. If you are photographing birds, that may be 1/1000th second or faster. However, for general photography of slower-moving subjects, you might be able to take pictures at 1/200th second, 1/100th second, or even longer without introducing motion blur.

    Long shutter speeds are typically above 1 second – at which point, you will need to use a tripod to get sharp images. You would use long shutter speeds for certain types of low-light / night photography, or to capture movement intentionally. If anything in your scene is moving when you use long shutter speeds, it will appear very blurry.

    In between, shutter speeds from 1/100th second to 1 second are still considered relatively slow. You may not be able to handle them without introducing camera shake from your hands, especially close to the one-second mark.

    Also, this strongly depends upon your lens. Some lenses, such as the Nikon 70-200mm f/2.8, have specific image stabilization (also known as “vibration reduction”) technologies within the lens that can help photographers take pictures at very slow shutter speeds when hand-holding cameras, without introducing camera shake. Other lenses do not have vibration reduction, which means you need to use the reciprocal rule instead to determine how long your shutter speed should be without introducing blur from camera shake. It is also important that you know how to hold a camera.

    Note: If you want to make some adjustments to the photo just let me know. I can do it for you at a very low cost. You can hire me to edit your photo.

    How to set shutter speed

    Most cameras handle shutter speeds automatically by default. When the camera is set to “Auto” mode, the shutter speed is selected by the camera without your input (and so are aperture and ISO). However, you can still set the shutter speed manually if necessary:

    1. By setting the camera to “Shutter Priority” mode, you choose the shutter speed, and the camera automatically selects the aperture.
    2. By setting the camera to “Manual” mode, you choose both shutter speed and aperture manually.

    Within both of these modes, you can choose to set ISO manually or automatically.

    In most cases, we recommend letting the camera select the correct shutter speed for you. Still, watch to be certain that you aren’t introducing too much motion blur in a photo (or freezing motion that you want to be blurred). I cover more of this in an article on camera modes, but I tend to shoot in “Aperture Priority” mode 95% of the time, letting the camera calculate the shutter speed automatically.

    How to find shutter speed

    Do you know how to find what your camera shutter speed is set to? It is typically very easy to find it. On cameras that have a top panel, the shutter speed is typically located on the top left corner, as circled:

    If your camera does not have a top LCD, like some entry-level DSLRs, you can look through the viewfinder, where you will see the shutter speed on the bottom-left side. And if your camera has neither a top LCD nor a viewfinder, like many mirrorless cameras, you can see your shutter speed simply by looking on the back screen.

    On most cameras, the shutter speed will not show up directly as a fraction of a second – it will typically be a regular number. When the shutter speed is longer than or equal to one second, you will see something like 1” or 5” (with the quotation sign to indicate a full second).

    If you still cannot find the shutter speed, set your camera to “Aperture Priority” mode, and make sure that you have turned “AUTO ISO” off. Then, start pointing around your camera from dark to bright areas. The number that changes will be your shutter speed.

    Note: If you want to make some adjustments to the photo just let me know. I can do it for you at a very low cost. You can hire me to edit your photo.

  • What is a Mirrorless Camera?

    What is a Mirrorless Camera?

    While a DSLR camera uses a mirror mechanism to either reflect light into an optical viewfinder or pass it through directly to the camera sensor, a mirrorless camera completely lacks such mirror mechanism (hence the name), which means that the light passing through the lens always ends up on the imaging sensor. Since light is no longer reflected on an optical viewfinder (OVF), mirrorless cameras typically rely on electronic viewfinders (EVF) and LCDs that basically project what the imaging sensor sees. Because of the lack of a mirror mechanism and an optical viewfinder, mirrorless cameras can be made simpler, lighter, and less bulky when compared to DSLR camera.

    Below is an illustration that shows the difference between a DSLR and a mirrorless camera:

    DSLR Compared to Mirrorless Camera

    As you can see, when compared to a mirrorless camera, a DLSR has a lot more components that make up the internals of the camera. Aside from the complex mirror mechanism, there is a focusing screen, a condenser lens, pentaprism / pentamirror and other components such as a secondary mirror and a phase-detection autofocus sensor that are present on a DSLR.

    How Mirrorless Cameras Work

    In contrast, a mirrorless camera is much simpler mechanically – light passes through the lens (#1) directly onto the image sensor (#4) and the optical viewfinder is replaced with an electronic viewfinder (#9) that replicates the image sensor. In normal operation, the mechanical camera shutter (#3) stays open and is only typically utilized at the end of exposure. Due to lack of both mirror and pentaprism, the flange distance (which is the distance between the lens mount and the image sensor) on mirrorless cameras can be shortened significantly, as the illustration above shows. Because of this, most mirrorless camera bodies are thinner and lighter compared to DSLRs.

    Mirrorless cameras have many advantages over DSLR cameras. Aside from the potentially lighter weight and bulk of the camera itself, the use of an electronic viewfinder can bring many benefits to photographers. Since everything is duplicated directly from the image sensor, camera settings such as white balance, saturation and contrast can be seen through the viewfinder directly and additional information overlays including live histograms can be placed within the viewfinder, allowing photographers to see exactly what they are about to take a picture of. When combined with fast contrast-detection or on-sensor phase detection system, one can take advantage of being able to zoom in on a subject to verify focus, use focus peaking, face detection and other powerful features to ensure that focus is achieved precisely with every shot. When shooting in daylight conditions, one can utilize the electronic viewfinder to review images, instead of relying on the back LCD of the camera.

    At the same time, mirrorless cameras have their list of disadvantages. First, the electronic viewfinder can only be active when the camera is turned on and power is provided to the image sensor, which can significantly affect the battery life of a camera. Second, electronic viewfinders can have noticeable lag, blackouts and high contrast, which can make it difficult for some photographers to get used to. When it comes to autofocus, although the latest mirrorless camera models can be very fast and accurate, they still do not do as well when shooting fast action, especially in low-light situations.

    We wrote a detailed post that compares mirrorless cameras to DSLRs, so if you would like to find out more about the pros and cons of each, please take a look at our Mirrorless vs DSLR article. Explore the article of best cameras for movie production.

    Note: If you want to make some adjustments to the photo just let me know. I can do it for you at a very low cost. You can hire me to edit your photo.

  • What is a DSLR Camera?

    DSLR stands for “Digital Single Lens Reflex”. In simple language, a DSLR is a digital camera that uses a mirror mechanism to either reflect light from a camera lens to an optical viewfinder (which is an eyepiece on the back of the camera that one looks through to see what they are taking a picture of) or let light fully pass onto the image sensor (which captures the image) by moving the mirror out of the way.

    Although single lens reflex cameras have been available in various shapes and forms since the 19th century with film as the recording medium, the first commercial digital SLR with an image sensor appeared in 1991. Compared to point-and-shoot and phone cameras, DSLR cameras typically use interchangeable lenses.

    1) What DSLR camera consist of

    Take a look at the following image of an SLR cross section (image courtesy of Wikipedia):

    DSLR Cross Section

    2) How DSLR camera work

    When you look through a DSLR viewfinder / eyepiece on the back of the camera, whatever you see is passed through the lens attached to the camera, which means that you could be looking at exactly what you are going to capture. Light from the scene you are attempting to capture passes through the lens into a reflex mirror (#2) that sits at a 45 degree angle inside the camera chamber, which then forwards the light vertically to an optical element called a “pentaprism” (#7). The pentaprism then converts the vertical light to horizontal by redirecting the light through two separate mirrors, right into the viewfinder (#8).

    When you take a picture, the reflex mirror (#2) swings upwards, blocking the vertical pathway and letting the light directly through. Then, the shutter (#3) opens up and the light reaches the image sensor (#4). The shutter (#3) remains open for as long as needed for the image sensor (#4) to record the image, then the shutter (#3) closes and the reflex mirror (#2) drops back to the 45 degree angle to continue redirecting the light into the viewfinder.

    Obviously, the process doesn’t stop there. Next, a lot of complicated image processing happens on the camera. The camera processor takes the information from the image sensor, converts it into an appropriate format, then writes it into a memory card. The whole process takes very little time and some professional DSLRs can do this 11+ times in one second!

    The above is a very simple way to explain how DSLR camera work.

    To read a lot more about DSLRs, check out this great article at Wikipedia.

    Note: If you want to make some adjustments to the photo just let me know. I can do it for you at a very low cost. You can hire me to edit your photo.